> ## Documentation Index
> Fetch the complete documentation index at: https://help.cryptolens.io/llms.txt
> Use this file to discover all available pages before exploring further.
# Feature Templates
> Describes the idea behind feature templates so that you can support more than 8 features.
> Originally published on [our blog](https://cryptolens.io/2019/05/support-for-any-number-of-features/).
## Idea
A common request we have received from our customers is to support more than 8 features. Until now, the recommended approach has been to use the notes field or data object fields to store any additional feature information. With this update, the dashboard and several of our clients have built in support for additional features.
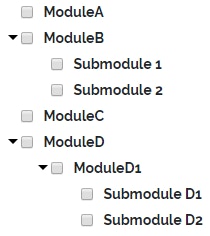
In addition to being able to define any number of features, we have also made it possible to define feature hierarchies. For example, we can define the following feature hierarchy:
Now, suppose the user opens ModuleB. With the above setup, we can either check if they have permission to use ModuleB or we can be more specific and require Submodule 1 to be present.
We will go through in more detail how you can get started later in the article. The feature template used for our above example is shown below:
```
["ModuleA", ["ModuleB", ["Submodule 1", "Submodule 2"]], "ModuleC", ["ModuleD", [["ModuleD1", ["Submodule D1", "Submodule D2"]]]]]
```
## Set up
### Defining features
#### Simple hierarchy
Let’s suppose we want to define the following feature hierarchy:
To define it, we can use a JSON array structure shown below:
```
["ModuleA", "ModuleB", "ModuleC"]
```
#### Adding submodules
Suppose now that we want to add sub features to ModuleB. For example, Submodule 1 and Submodule 2. To do that, we introduce a new array instead of the string “Module B”, which has the following structure:
```
["ModuleA", ["Module B", ["Submodule 1", "Submodule 2"]], "ModuleC"]
```
The first element defines name of the module, and the second element should ways be a list of submodules.
#### Another example with sub modules
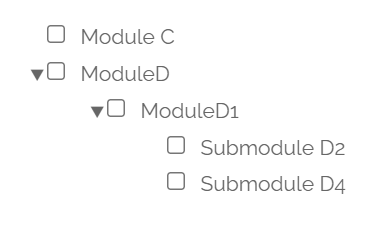
We can keep adding submodules to submodules in a similar fashion. For example, to express the following features:
the template below can be used:
```
["Module C", ["ModuleD", [["ModuleD1", ["Submodule D2", "Submodule D4"]]]]]
```
#### How to add a template to a product
To add your feature template to a product, you can click on **License Settings** on the product page and then scroll down until you see Feature Template.
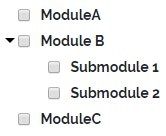
In the example below, we would get the following feature hierarchy
It’s defined with the following feature template
```
["ModuleA", ["ModuleB", ["Submodule 1", "Submodule 2"]], "ModuleC"]
```
Please check out *Examples* section at the end of this page for more templates.
### Assigning features
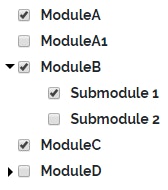
Once you have defined the feature template, the page to create a new license key and to edit existing one will have a box that allows you to define them, as shown below. The state will be stored in a data object with the name cryptolens\_features, which we will cover in the next step.
### Verifying features
You can verify that a certain feature exists using `Helpers.HasFeature`. For example, to check if Submodule1 is present, the following code can be used:
```c# theme={null}
Helpers.HasFeature(license, "ModuleB.Submodule 1")
```
If you only want to check if ModuleB is present, without being specific, you can instead use:
```c# theme={null}
Helpers.HasFeature(license, "ModuleB")
```
### Examples
The modules below:
can be expressed as:
```
["ModuleA", "ModuleC", ["ModuleD", [["ModuleD1", ["ModuleD1.1", "ModuleD1.2"]], ["ModuleD2", ["ModuleD2.1", "ModuleD2.2"] ], "ModuleD3", "ModuleD4" ]], "ModuleE"]
```
 Now, suppose the user opens ModuleB. With the above setup, we can either check if they have permission to use ModuleB or we can be more specific and require Submodule 1 to be present.
We will go through in more detail how you can get started later in the article. The feature template used for our above example is shown below:
```
["ModuleA", ["ModuleB", ["Submodule 1", "Submodule 2"]], "ModuleC", ["ModuleD", [["ModuleD1", ["Submodule D1", "Submodule D2"]]]]]
```
## Set up
### Defining features
#### Simple hierarchy
Let’s suppose we want to define the following feature hierarchy:
Now, suppose the user opens ModuleB. With the above setup, we can either check if they have permission to use ModuleB or we can be more specific and require Submodule 1 to be present.
We will go through in more detail how you can get started later in the article. The feature template used for our above example is shown below:
```
["ModuleA", ["ModuleB", ["Submodule 1", "Submodule 2"]], "ModuleC", ["ModuleD", [["ModuleD1", ["Submodule D1", "Submodule D2"]]]]]
```
## Set up
### Defining features
#### Simple hierarchy
Let’s suppose we want to define the following feature hierarchy:
 To define it, we can use a JSON array structure shown below:
```
["ModuleA", "ModuleB", "ModuleC"]
```
#### Adding submodules
Suppose now that we want to add sub features to ModuleB. For example, Submodule 1 and Submodule 2. To do that, we introduce a new array instead of the string “Module B”, which has the following structure:
```
["ModuleA", ["Module B", ["Submodule 1", "Submodule 2"]], "ModuleC"]
```
The first element defines name of the module, and the second element should ways be a list of submodules.
#### Another example with sub modules
We can keep adding submodules to submodules in a similar fashion. For example, to express the following features:
To define it, we can use a JSON array structure shown below:
```
["ModuleA", "ModuleB", "ModuleC"]
```
#### Adding submodules
Suppose now that we want to add sub features to ModuleB. For example, Submodule 1 and Submodule 2. To do that, we introduce a new array instead of the string “Module B”, which has the following structure:
```
["ModuleA", ["Module B", ["Submodule 1", "Submodule 2"]], "ModuleC"]
```
The first element defines name of the module, and the second element should ways be a list of submodules.
#### Another example with sub modules
We can keep adding submodules to submodules in a similar fashion. For example, to express the following features:
 the template below can be used:
```
["Module C", ["ModuleD", [["ModuleD1", ["Submodule D2", "Submodule D4"]]]]]
```
#### How to add a template to a product
To add your feature template to a product, you can click on **License Settings** on the product page and then scroll down until you see Feature Template.
In the example below, we would get the following feature hierarchy
the template below can be used:
```
["Module C", ["ModuleD", [["ModuleD1", ["Submodule D2", "Submodule D4"]]]]]
```
#### How to add a template to a product
To add your feature template to a product, you can click on **License Settings** on the product page and then scroll down until you see Feature Template.
In the example below, we would get the following feature hierarchy
 It’s defined with the following feature template
```
["ModuleA", ["ModuleB", ["Submodule 1", "Submodule 2"]], "ModuleC"]
```
Please check out *Examples* section at the end of this page for more templates.
### Assigning features
Once you have defined the feature template, the page to create a new license key and to edit existing one will have a box that allows you to define them, as shown below. The state will be stored in a data object with the name cryptolens\_features, which we will cover in the next step.
It’s defined with the following feature template
```
["ModuleA", ["ModuleB", ["Submodule 1", "Submodule 2"]], "ModuleC"]
```
Please check out *Examples* section at the end of this page for more templates.
### Assigning features
Once you have defined the feature template, the page to create a new license key and to edit existing one will have a box that allows you to define them, as shown below. The state will be stored in a data object with the name cryptolens\_features, which we will cover in the next step.
 ### Verifying features
You can verify that a certain feature exists using `Helpers.HasFeature`. For example, to check if Submodule1 is present, the following code can be used:
```c# theme={null}
Helpers.HasFeature(license, "ModuleB.Submodule 1")
```
If you only want to check if ModuleB is present, without being specific, you can instead use:
```c# theme={null}
Helpers.HasFeature(license, "ModuleB")
```
### Examples
The modules below:
### Verifying features
You can verify that a certain feature exists using `Helpers.HasFeature`. For example, to check if Submodule1 is present, the following code can be used:
```c# theme={null}
Helpers.HasFeature(license, "ModuleB.Submodule 1")
```
If you only want to check if ModuleB is present, without being specific, you can instead use:
```c# theme={null}
Helpers.HasFeature(license, "ModuleB")
```
### Examples
The modules below:
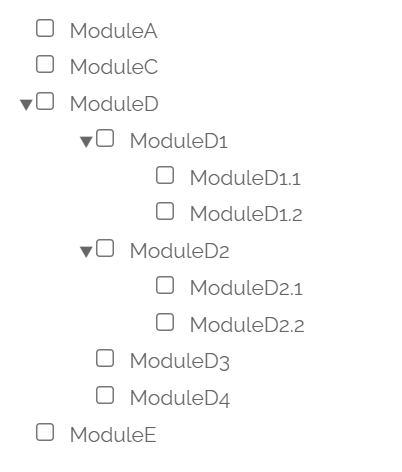 can be expressed as:
```
["ModuleA", "ModuleC", ["ModuleD", [["ModuleD1", ["ModuleD1.1", "ModuleD1.2"]], ["ModuleD2", ["ModuleD2.1", "ModuleD2.2"] ], "ModuleD3", "ModuleD4" ]], "ModuleE"]
```
can be expressed as:
```
["ModuleA", "ModuleC", ["ModuleD", [["ModuleD1", ["ModuleD1.1", "ModuleD1.2"]], ["ModuleD2", ["ModuleD2.1", "ModuleD2.2"] ], "ModuleD3", "ModuleD4" ]], "ModuleE"]
```