> ## Documentation Index
> Fetch the complete documentation index at: https://help.cryptolens.io/llms.txt
> Use this file to discover all available pages before exploring further.

# (Example) Automating customer and license creation

> Description of your new file.

## Introduction

In this tutorial we will go through the steps needed to automatically create new customers and assign them a license key upon a successful transaction. We will assume that you already have a payment form with at least one payment processor. Please review these articles before you continue reading this tutorial:

* [Overview of Payment Forms](https://help.cryptolens.io/payment-form/index)
* [Overview of Requests and Custom Field](https://help.cryptolens.io/payment-form/request)

<Note>
  **Update since 2020.05.04**: A customer can automatically be created in the CreateKey request. If you set `NewCustomer=true`, a new customer will be created and if `AddOrUseExistingCustomer=true`, an existing customer with the same email will be used or a new customer will be created. In both cases, you can call [CreateKey](https://app.cryptolens.io/docs/api/v3/CreateKey) with the same parameters that [AddCustomer](https://app.cryptolens.io/docs/api/v3/AddCustomer) accepts.
</Note>

## Idea

In order to both create a new customer and then assign them a new license key, we will send two requests to the [Web API](https://app.cryptolens.io/docs/api/v3), one to **create a customer** and one to **create license** key associated with that customer. The links to the required methods are provided below.

<Info>
  Note, we will look more into the details of how to set things up in the next section.
</Info>

* [Create a customer (Web API docs)](https://app.cryptolens.io/docs/api/v3/AddCustomer)
* [Create a license (Web API docs)](https://app.cryptolens.io/docs/api/v3/CreateKey)

## Implementation

### Creating an access token

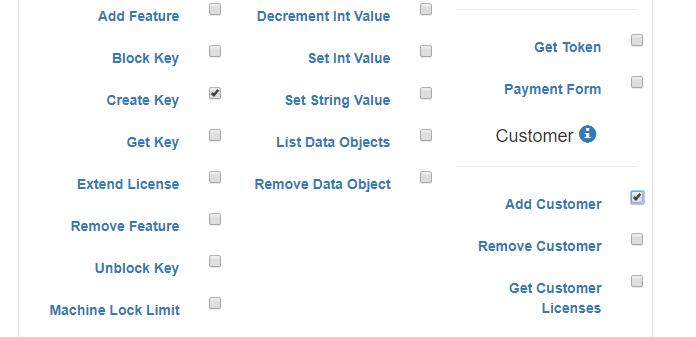
In order to ensure that API calls we perform (i.e. the requests) work, we need an access token with **CreateKey** and **AddCustomer** permission, which you can create below:

* [Create an access token](https://app.cryptolens.io/User/AccessToken#/newtoken)

Please tick the right permissions as shown below and save the token that is generated.
<img src="https://mintcdn.com/cryptolensab/j6HibCfqNX45CJIL/images/payment-form-auto-key-create-1.png?fit=max&auto=format&n=j6HibCfqNX45CJIL&q=85&s=7a22a96774dfc130a90ecea8216ee895" alt="Payment Form Auto Key Create 1 Pn" width="696" height="337" data-path="images/payment-form-auto-key-create-1.png" />

Here is an example of a token you can get:

```
WyIxMjc0IiwieUN2RjYveDZTVktsVm9XZFhVcmtTdzZJSm1yTU1zTnZoTXdKQmNsSSJd
```

### Setting up API calls

#### Creating a customer

A customer can be created using the url below. You can review other parameters of this method [here](https://app.cryptolens.io/docs/api/v3/Customer).

<Info>
  In the request below we have added name parameter that comes from the custom field.
</Info>

```
https://app.cryptolens.io/api/customer/AddCustomer?Name=[custom]&token=<use the token we generated in the previous section>
```

#### Creating a new license

Once a customer is created, the API call above will return and `customerId`. When creating a new license, we will use this `customerId` to make sure that the license is added to this customer. In the url below, a license key will be created with `Feature=True` and it will be associated with the customer created earlier.

<Note>
  Note, you need to specify **ProductId** of the desired product, which you can find on the product page.
</Note>

```
https://app.cryptolens.io/api/key/CreateKey?CustomerId=[customerId]&Feature=True&ProductId=<enter the product id>&token=<use the token we generated in the previous section>
```

### Adding Requests in the Payment Form

Once we have working API call urls (covered in the previous section), most of the job is done. We now need to add these urls as **request items** in the payment form.

When you scroll down, you will see the requests that will be executed upon a successful transaction:

<img src="https://mintcdn.com/cryptolensab/j6HibCfqNX45CJIL/images/payment-form-auto-key-create-2.png?fit=max&auto=format&n=j6HibCfqNX45CJIL&q=85&s=c9529ca85b374ca8b9f5878a3a03e00d" alt="Payment Form Auto Key Create 2 Pn" width="558" height="214" data-path="images/payment-form-auto-key-create-2.png" />

For each of the API call urls from [creating a customer](https://help.cryptolens.io/payment-form/automating-customer-and-license-creation#creating-a-customer) and [creating a new license](https://help.cryptolens.io/payment-form/automating-customer-and-license-creation#creating-a-new-license) sections, you need to create a request item.

<Note>
  Note, we should set type to **Data Request** and method to **GET**.
</Note>

Below is an image summarizing the type of request to create:

<img src="https://mintcdn.com/cryptolensab/j6HibCfqNX45CJIL/images/payment-form-auto-key-create-3.png?fit=max&auto=format&n=j6HibCfqNX45CJIL&q=85&s=5c6d1a7cb1bb7e64bd09c0ca84f1429e" alt="Payment Form Auto Key Create 3 Pn" title="Payment Form Auto Key Create 3 Pn" style={{ width:"65%" }} width="421" height="304" data-path="images/payment-form-auto-key-create-3.png" />

Once you have added the requests, that section in the payment form should look similar to what is shown below:

<img src="https://mintcdn.com/cryptolensab/j6HibCfqNX45CJIL/images/payment-form-auto-key-create-4.png?fit=max&auto=format&n=j6HibCfqNX45CJIL&q=85&s=713226ef488be5a4e9e8a48d014d9bdf" alt="Payment Form Auto Key Create 4 Pn" title="Payment Form Auto Key Create 4 Pn" style={{ width:"77%" }} width="553" height="190" data-path="images/payment-form-auto-key-create-4.png" />

<Warning>
  It is important that the top request is to **add a customer** and that the **add license** request is below.
</Warning>

### Customizing success message

If you would like to use the built in success page, we can customize it to show the license key upon a successful payment. We have so far used two API calls, one to [create a customer](https://app.cryptolens.io/docs/api/v3/AddCustomer) and another to [create a license key](https://app.cryptolens.io/docs/api/v3/CreateKey). These methods will return the following variables (see **Results** section for each API call):

* **customerId** - (from Add Customer) the customer id
* **portalLink** - (from Add Customer) the link to the sign up form for the portal where customers can manage licenses (requires **EnableCustomerAssociation** to be true when creating the customer)
* **key** - (from Create Key) the key string

> Note: Although each variable is capitalized, the API will format all variables with came case, eg **PortalLink** becomes **portalLink**.

Using these variables, you can create a template for the message, for example:

```
Thank you for your order. Your key is [key] and customer id [customerId].
```

## Finishing up and testing

If everything was set up correctly, you can click on **Preview** of the form, which will show you the live payment form.

> Remember to add `?custom=<name>` in the end of the url to the live payment form.

The link that should be sent to your customer is similar to the one below:

```
https://app.cryptolens.io/Form/P/abcdefg/123?custom=<name>
```
