Introduction to payment forms
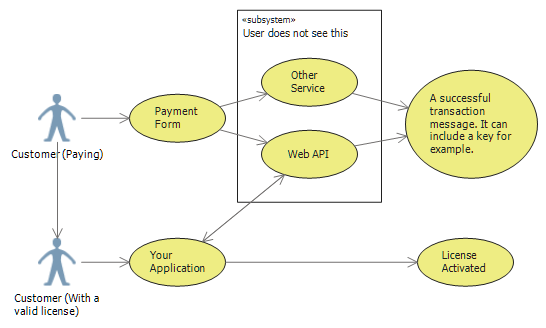
Using the Web API, you can achieve a great degree of automatization in your licensing solutions. By combining payment forms with the Web API, you can ensure that your customers receive a key directly after that they’ve purchased a license. This means that they can use your software right away. There’s no need to take any specific actions from your side. This is one of the advantages of using payment forms.
The Payment Form (the way it’s called in Serial Key Manager) feature is a way to get a configured and hosted solution to process payments. You only need to set up a Stripe and/or PayPal account; the rest is already done. Here’s an overview of the capabilities of the Payment Forms feature.
There are thee important concepts that are good to keep in mind when working with Payment Forms: Payment Form, Payment Processor and Request. Let’s quickly take a look at them.
This is the actual form that users will see. Here you can specify the price, the success message, what kind of Payment Processors you want to use, the type of Requests you want execute, et cetera. It’s the heart of your payment solution.
For a Payment Form to work, we need a Payment Processor that will process payments. It can be Stripe or PayPal, at the moment.
When a transaction is complete, it’s important to tell the Web API that you want to generate a new key that should be sent to the customer upon successful transaction. You can send a request to any other web application as well. There are two types of requests that can be sent:
The great thing about data requests is that they can send the payment form additional information (in JSON). For example, a success message may look like:
The key will later be replaced by a key from the Web API. The customer_id is an example of a variable that can be returned by your own web application. If this sounds complicated, don’t worry, we will cover it in more details later!