Stripe setup
Stripe will contain most of the information regarding products, plans, subscriptions and customers. Additional information that is required for Cryptolens is stored in the metadata parameters. We have listed the specific metadata parameters for each object in Stripe below:Products
The first step is to create a Stripe product, which can be done inBilling>Products. Each Stripe product will be linked to a product in Cryptolens. The way to link them is by creating a metadata parameter skm_product_id, and assign it the product id of a Cryptolens product. You can specify the metadata parameter after that the product has been created. The end result should be similar as shown in the picture below (3349 should be changed to your product id).

Plans
A product in Stripe can have multiple plans (assuming you are using the newest version of the API). A plan allows you to set the billing interval (eg. monthly or early) and optionally the number of trial days (i.e. the number of days a user can use the software for free before being charged). Cryptolens will detect all of these settings. The only piece of additional information Cryptolens needs to know is the type of license key to generate (eg. what features, etc). This can also be specified using the metadata fieldskm in JSON format.
Note: Under the hood, all the parameters passed in the metadata field will be sent to CreateKey method.
skm with the value {"F3":true}. If you want the same key to be node-locked to one device and have Feature 3 enabled, you can set skm parameter to {"F3": true, "MaxNoOfMachines": 1}. You can optionally add ProductId in the skm parameter, in case you want the license key to belong to a different product.
To change the name of the plan, you can use the Price description field, which is what Cryptolens will use in the customer portal.
Webhooks
In order to ensure that Cryptolens stays sync with Stripe about the status of each subscription, we need to add a receiving webhook endpoint. The version of the API used is 2018-09-06. You can create a webhook in two ways, either through Stripe’s dashboard to curl. If you cannot select the API version in dashboard, you can fallback on curl. Cryptolens’ Stripe endpoint has the following url:https://app.cryptolens.io/api/subscription/StripeUrl?id=<your user id>. You can find your specific url on this page.
In the dashboard
Please visitDevelopers>Webhooksand create an endpoint with the following configuration:
- URL to be called:
https://app.cryptolens.io/api/subscription/StripeUrl?id=<your user id>(note, this is the Stripe Webhook url ) - APIv version: 2018-09-06 (if yo cannot select this, please use curl as described below)
- Filter event: select
select types to sendand checkinvoice.payment_succeededandcustomer.subscription.deleted.
Using curl
To create webhook endpoint through Stripe’s API, we can use tools such as curl. In the call below, you need to replace Stripe’s private key (sk_test_123abcd)`and the url.
whsec_CTQa9jRJY3LlnE28Xpv4gLejONQKjHv4. We will need this value in the Cryptolens setup section.
Cryptolens setup
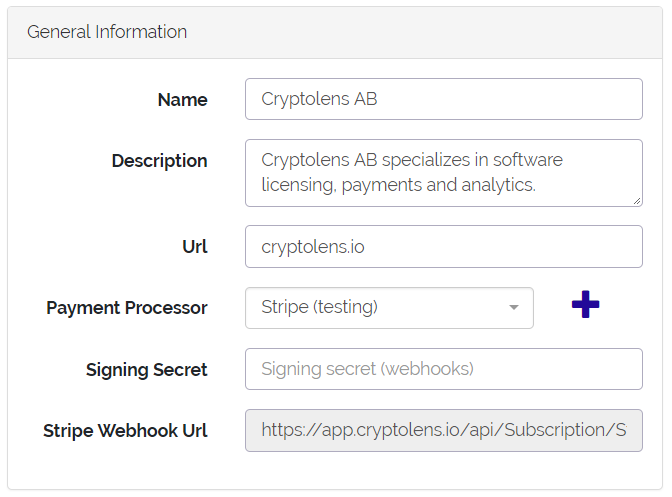
All the stripe configuration will occur on Company Profile page (show below). We assume you have already created a Cryptolens product.
- Name and Description: This information be shown on your profile page, which can be accessed at
https://app.cryptolens.io/Portal/@<domain>/. - Url: This is required for recurring payments and the profile page. Please enter your domain name only, eg.
example.com. - Payment Processor: Please select a Stripe payment processor, where you will be able to enter your test keys or connect to Stripe for live keys.
- Signing Secret: This is the webhook secret we obtained in the previous section, which is similar to
whsec_CTQa9jRJY3LlnE28Xpv4gLejONQKjHv4. - Stripe Webhook Url: This is the endpoint that should be registered with Stripe.